Personalize & Send Messages Using Template Variables
You can personalize your Message Templates using variables and send customer-specific data in the message when sending your Notifications.

Variables (also known as merge tags) in message templates work slightly differently in WhatsApp compared to how they usually work in other places, like email templates.
With WhatsApp, it’s a two-step process:
Step 1 – Create Message Template with Variable Placeholders
First, you create a Message Template with variable placeholders like {{1}}, {{2}}, {{3}}, and so on, wherever you want dynamic content to appear. For example, your message body could look like this:
{{1}}.Your order number is {{2}}. Thank you for placing your order.Team YourStoreYou can also personalize button links by adding a variable to the button’s Website URL field, like this:
Note for button links:
- You can add a maximum of one variable (e.g.,
{{1}}) to a button link. - The variable must be placed at the end of the URL, as shown in the example above.
- You cannot add more than one variable to the button URL or insert it anywhere other than at the end.
If you’re coming from an email marketing background, this process might seem different from what you’re used to. However, as the template is sent to WhatsApp for approval, this is how they require you to create it to simplify the process.
Check out the guides below to create different types of message templates:
- Learn how to create a Marketing template
- Learn how to create a Utility template
- Learn how to create an Authentication template
Step 2 – Create Notification and do Variable Mapping
Once you’ve set up variable placeholders in your message template, the next step is to map those variables with actual data when sending a Notification.
After creating the message template, create a Notification and select the Message Template you want to use.
Once you’ve selected the template, you will see the option to map the variables ({{1}}, {{2}}, {{3}}, etc.) in your message template with actual data such as first name, last name, phone number, custom contact attributes, or data fields from the trigger (in the case of Transactional/Integration/API Notification) under the Value column.
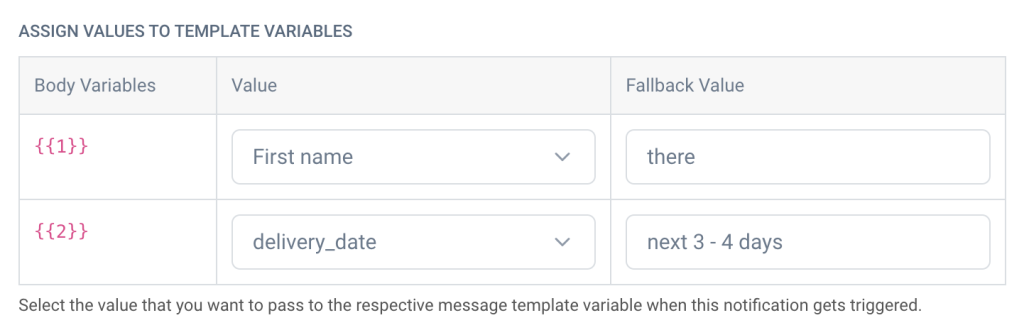
You can also add a Fallback Value for each variable for cases when data from the actual Value field might come empty. For such cases, the system will take value from the Fallback Value column.
Now that you know how to personalize your message text using variables, let’s see how to send unique images using image templates to each contact.
Updated on: 07/07/2025
Thank you!