How to Create a Message Template?
In this article we’re going to see how to create text-only message templates, media-based message templates and message templates with variables. If you’re not sure what message templates are make sure to read our article on the topic.
Before diving into how to create the templates, let’s explore the anatomy of a message template.
Anatomy of a Message Template
Message templates are feature rich messages that contain different parts like: header, body, footer and the buttons. Let’s look at each of these parts in detail.
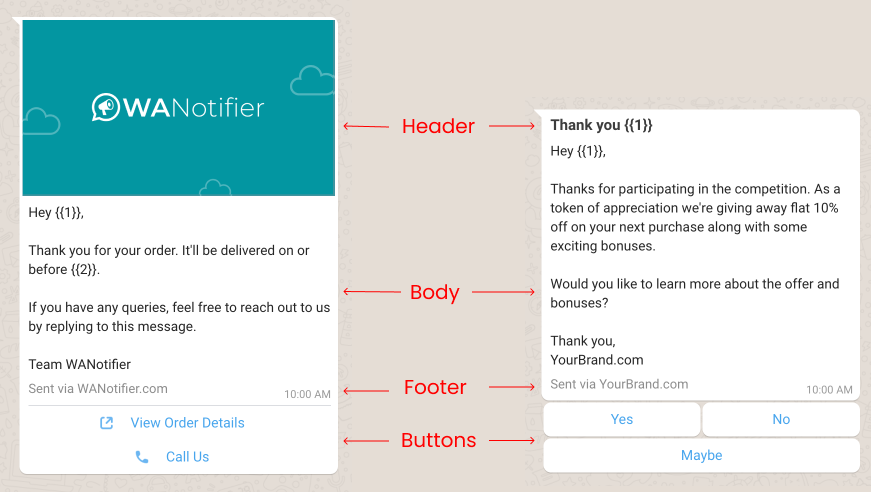
Header
A message template can have two different types of headers – plain text and media.
Plain-text
When you select header type as text, the text appears on top of the message in bold. The header text can have a maximum length of 60 characters. You can also a variable {{1}} to this text to personalize the header text. We’ve covered how to use variables in this article: Personalize Message Template with Variables.
Media
In case you select the type as media, you have three choices of media that you can put in the header:
- Image
- Video
- Document
You can only add a maximum of one media in a message template. The media you upload when creating a message template is like a placeholder and you can replace if with some some media as well when sending the template.
Header is an optional field.
Body
Body of the message template is where you add the main text content of the message. You can add text content with upto 1024 characters. The text here can also be formatted to make it look and read better using shorthands:
- Bold: \*text\* will male it text
- Italics: \_text\_ will make it text
- Strikethrough: ~text~ will make it text
- Monospace or code: “
text“will make ittext
Also, similar the header text, you can also add variables to the body content. There is no limit on the number of variables ({{1}}, {{2}}, {{3}} etc) you can add to body text as long as the overall content is less than 1024 characters.
Note that body text is a required field.
Footer
You can also add a footer text to your message templates. The maximum characters allowed for footer text is 60 characters. You can not add variables in footer text.
Usually the footer text is used by businesses to show their business name or write texts like “Reply STOP to unsubscribe” to inform users to perform certain actions.
Footer text is an optional field.
Buttons
You can also add buttons to your message templates. In total you can add upto 10 buttons. Here are different types of buttons that you can add:
- Call to Action – You can add different types of buttons like Visit Website, Call Phone Number, Copy Offer Code, View Product Catalog and so on.
- Quick Reply – You can add quick reply buttons with short text (with upto 25 characters). When your customer clicks on any of these buttons, the text is sent back to you on chat.
Buttons are optional and you may or may not add them in your templates.
Now that we’ve looked into the structure of a message template, let’s look into how to create one in WANotifier.
How to Create a Message Template?
On WANotifier, we provide a full fledged dashboard for creating message templates. You may also create the templates directly on the WhatsApp Manager if you want and fetch them from your WANotifier dashboard.
In this article, we’ll look into how you can create the template from our dashboard.
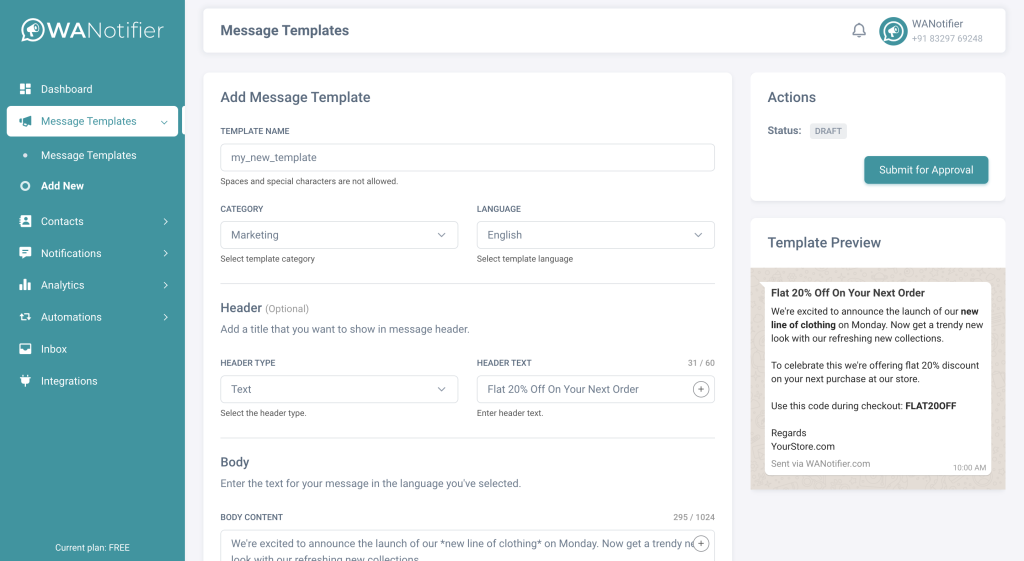
Let see the exact steps to create a message template:
- Login to your WANotifier account.
- From the left sidebar go to the Message Templates > Add new page.
- In the Template Name field enter a name for the template. Note that the template name can only have alpha-numeric characters and underscores. Also the whole name must be in small letters.
- After entering the name, select category from the Category dropdown. Note that it’s important to select correct category for your templates to avoid rejection by WhatsApp.
- We’ve written a detailed article about Message Template Categories where you can learn about which category to select during this step.
- Now select the language of the template from the Language dropdown. Note that selecting correct language here helps in faster review and approval of templates by WhatsApp.
- Now from the Header section select the Header Type. You can select from either Text or Media or leave it as None if you do not want header in your templates.
- Text – when you select this as the type, you’ll get a new field Header Text where you can enter text with upto 60 characters. You can also add 1 variable {{1}} to personalize the header text.
- Media – when you select this as header type, you’ll get the option to select a Media Type with 3 options: Image, Video and Document. Select the one you like.
- Once you select a Media Type, you’ll find an upload button to upload your Upload Example media. Note that this media can be either sent as it is (like in case of some promotional image or video) or it can be changed for each message (like in case of PDF invoices). If you want to send unique PDF invoices with each notification, make sure you upload an example PDF with your invoice format.
- After the header is setup, it’s time to put your text content in Body field. You can put any content here as long as it complies Message Template Guidelines given by WhatsApp. In this body field you can also add variables like {{1}}, {{2}}, {{3}} and so on and map them with actual data when sending a Notification as explained here.
- Note that when you put variables in the Body text, you’ll see Sample Text fields appear below for each variable. You need to enter sample dummy data for WhatsApp team to review and understand what kind of data you’ll be sending. Note that this sample data is not saved in your template, it is only required for the template review process.
- Next, you can put some Footer text for your template. Usually this should contain your business name or general message for the receivers like “Reply STOP to unsubscribe” which you can configure with our Unsubscribe automation. Footer field is optional so you can also leave it blank if you do not want it.
- After this, the last section is for Buttons. You can leave this section as is if you do not want to add buttons or click on Add Button to add upto 10 buttons.
- After you finish all the above mentioned steps, click on the Submit for Approval button from the right hand sidebar. A popup will appear. Click on the Ok button in the popup to submit the template.
Once you submit the template, it is saved on our portal and is sent to WhatsApp for their approval. It may take anywhere between 30 min to 48 hours to get your template reviewed. You can not start using this template until it’s approved by them.
Note that as there is a review process involved and it takes time, it’s always good to follow message template guidelines when creating your template to prevent it from getting rejected.
Updated on: 02/04/2025
Thank you!